
A trailer axle maintenance guide for transport fleets should combine daily driver checks with scheduled technician inspections, wheel-end servicing, alignment verification, brake testing, and documented defect escalation. The purpose is not only to prevent axle failure, but also to control tire expense, roadside recovery costs, trailer downtime, and safety risk across different operating conditions.
Park on level ground, isolate the trailer, apply PPE, and use rated lifting equipment with jack stands before inspection.
Check tires, wheels, hubs, bearings, seals, suspension, brakes, axle tubes, spindles, and fasteners in a fixed sequence.
Match service intervals to mileage, trailer utilization, load severity, road conditions, climate, and previous defect history.
Record inspection results, torque readings, lubrication dates, defects, repair decisions, and return-to-service authorization.
Remove trailers from service immediately when cracks, excessive wheel play, overheating, severe leakage, or structural deformation appears.
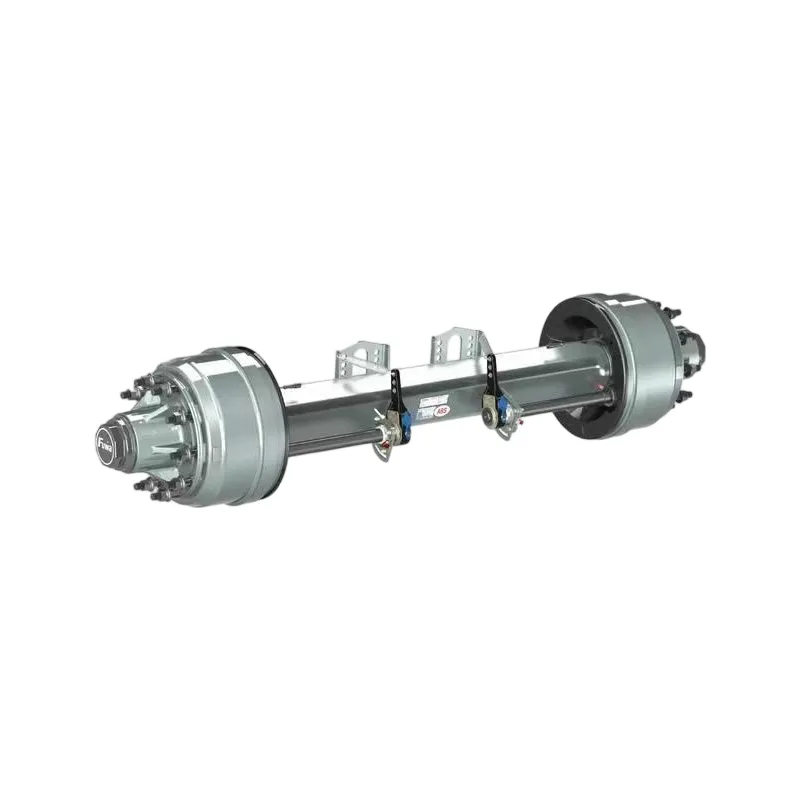
Trailer axle maintenance is a preventive process covering the wheel-end assembly, axle beam, spindle, brakes, suspension, tires, alignment, lubrication, and structural fasteners. A fleet program should separate driver-level pre-trip inspections from technician-level service work, because these activities require different tools, training, and acceptance criteria. The driver identifies visible or operational symptoms, while a qualified technician confirms component condition and performs adjustments or replacement.
Traditional maintenance based only on fixed calendar dates can miss important risk differences. A refrigerated trailer operating 140,000 miles annually on salted winter roads does not require the same control plan as a lightly used flatbed traveling 30,000 miles per year in a dry climate. The schedule should therefore use mileage, time, load intensity, road exposure, axle design, and defect history together.
Linfeng is a trailer axles manufacturer and trailer component supplier whose company information identifies Hebei Linfeng Machinery Manufacturing Co., Ltd. as a producer of trailer axles, American, German, European, and reverse-mounted suspension systems, leaf springs, U-bolts, cast steel parts, and related trailer components. Its published company profile lists establishment in 2024, 100 employees, five senior technicians, and 10 workshops. For fleet buyers, these details are useful starting points, but supplier approval should still include drawings, material records, dimensional inspection data, load ratings, warranty terms, batch traceability, and delivery controls.
Before beginning trailer axle service, collect the trailer identification number, axle model, rated capacity, wheel-end configuration, brake type, suspension type, tire specification, and the latest inspection record. The service technician should have the applicable axle manufacturer’s service manual because bearing adjustment, lubricant type, seal installation, fastener torque, and wheel-end endplay can vary by design. Do not substitute a generic torque value or grease specification when the axle supplier provides a model-specific requirement.
Required equipment normally includes a calibrated torque wrench, wheel chocks, hydraulic jack, rated jack stands, pry bar, dial indicator, infrared thermometer, tire-pressure gauge, tread-depth gauge, grease equipment, brake inspection tools, cleaning supplies, and adequate lighting. PPE should include safety glasses, protective gloves, safety footwear, and suitable work clothing. When dust, chemical residue, or contaminated lubricant is present, use the respiratory and skin protection required by the site risk assessment.
The work area should be level, clean, and protected from traffic. Record the trailer’s mileage, load condition, reported symptoms, and last service date before disassembly. If the axle must be lifted, verify the jack and stands have a capacity above the actual axle load, position them at approved support points, and never rely on a hydraulic jack as the only support.
A driver-level inspection should be completed before the trailer enters service and repeated after any event involving a curb strike, pothole impact, overload, abnormal sway, or hard braking. Walk around the trailer and inspect the tires, wheels, hubs, suspension, axle beam, brake lines, air chambers, and visible fasteners. Look for fresh grease, oil, cracked metal, displaced components, missing fasteners, damaged brake hoses, and objects lodged near the wheel end.
Check each tire for inflation loss, sidewall damage, exposed cord, cuts, bulges, irregular tread wear, and dual-tire contact. Use a calibrated gauge rather than visual appearance because a dual tire can appear inflated while carrying a significant pressure difference. Measure tread depth when wear appears uneven, and record the position of the affected tire so the maintenance team can compare it with axle alignment and suspension findings.
After the visual inspection, listen and observe during low-speed movement in a controlled area. Grinding, clicking, rhythmic scraping, wheel wobble, trailer sway, or pulling during braking requires a service evaluation before dispatch. A driver should not attempt to tighten wheel bearings, repair a bent axle, weld a cracked beam, or repack a bearing beside the road.
Pre-trip checks detect visible defects before they become road calls. They are also the lowest-cost inspection layer because they require minutes rather than disassembly, specialized measurement, or replacement parts. The result should be recorded as pass, monitor, repair before dispatch, or remove from service, with a defect code that allows fleet managers to identify repeated failures.
Relying on tire appearance: Use a pressure gauge and compare readings with the trailer’s approved specification.
Ignoring fresh grease: A small leak may indicate seal damage, overfilled lubricant, hub damage, or excessive bearing temperature.
Dispatching with a warning symptom: Grinding, wheel play, smoke, or severe heat requires technician assessment before continued operation.
Technician-level wheel-end service begins with safe lifting, wheel removal, cleaning, and visual inspection. Check wheel studs, nuts, rims, hub flanges, dust caps, seals, spindle threads, bearing races, and bearing rollers for wear or damage. Use a calibrated torque wrench when reinstalling wheel fasteners, and apply the axle or wheel manufacturer’s specified sequence and value rather than an estimate based on experience.
Trailer wheel bearing maintenance should include checking lubricant condition, bearing adjustment, seal integrity, hub temperature, and endplay. When the design uses grease, inspect for contamination, metal particles, water intrusion, hardening, or discoloration caused by overheating. When oil-bath hubs are used, verify the oil level through the sight glass or approved inspection point and investigate any level reduction before adding fluid.
Measure bearing endplay with a dial indicator when the service manual requires measurement or when wheel play is suspected. Excessive play can damage the seal, hub, spindle, and brake assembly, while insufficient adjustment can generate heat and accelerate bearing failure. Replace bearings and races as a matched service set when pitting, scoring, flaking, blue heat marks, brinelling, or visible deformation is present.
Wheel-end failures can progress from minor leakage to overheating, bearing seizure, wheel separation, or brake contamination. Temperature records can help identify developing problems before visible damage occurs, especially when the same axle position repeatedly runs hotter than the others. A fleet can establish a baseline by recording hub temperatures after comparable routes, load conditions, and ambient temperatures.
Mixing lubricant types: Confirm grease or oil compatibility before servicing the hub.
Reusing damaged seals: A seal that has been removed, cut, hardened, or distorted should not be returned to service.
Over-greasing the hub: Excess lubricant can raise operating temperature and force grease past the seal.
Cleaning bearings with unsafe methods: Do not use compressed air to spin a bearing because it can cause personal injury and damage the bearing.
Uneven trailer tire wear is often related to axle alignment, bent suspension components, worn bushings, loose U-bolts, incorrect ride height, overloaded axles, or poor load distribution. Inspect the axle position relative to the trailer frame, spring seats, equalizers, torque arms, air-ride components, shackles, hangers, and suspension brackets. Look for shifted components, elongated bolt holes, cracked welds, corrosion thinning, and contact marks showing movement.
Measure alignment using the equipment and tolerance specified for the trailer design. Compare toe, camber, axle squareness, and wheel-end position rather than adjusting only the tire that shows wear. A recurring alignment deviation after repair may indicate a bent axle beam, damaged suspension hanger, worn bushing, distorted spring seat, or frame damage.
Check U-bolts and suspension fasteners for looseness, thread damage, corrosion, and stretching. Torque values must come from the applicable component manufacturer because U-bolt diameter, grade, thread condition, lubrication state, and suspension design affect the required setting. Do not reuse deformed U-bolts or apply heat to correct their position.
Load distribution is part of axle maintenance. Confirm that cargo placement keeps each axle within its rated capacity and that the trailer is not repeatedly operated with concentrated loads near one wheel end. Overloading increases bearing load, tire temperature, brake demand, suspension deflection, and fatigue stress in the axle beam.
A trailer can have properly lubricated bearings and still experience repeated failures if the axle is misaligned or the suspension is shifting under load. Tire wear provides field evidence of how the complete running gear is behaving. Reviewing tire cost by axle position can help connect alignment defects to total cost of ownership, especially when a fleet replaces tires before reaching the expected tread life.
Adjusting alignment without finding the cause: Measure the axle, suspension, frame, and wheel-end condition before correction.
Using impact tools for final torque: Impact tools may install fasteners quickly but do not confirm the required final torque.
Ignoring cargo patterns: Repeated load concentration can produce failures that appear to be component defects.
Commercial trailer brake and axle inspection should cover brake shoes or pads, drums or rotors, slack adjusters, chambers, hoses, wiring, sensors, and mounting hardware. Check for oil or grease contamination, uneven lining wear, cracked drums, heat checking, damaged adjusters, and restricted air lines. On electric or electronically controlled systems, confirm sensor wiring, connectors, and fault records according to the system service procedure.
Inspect the spindle for scoring, discoloration, thread damage, worn bearing seats, damaged seal surfaces, and signs of overheating. A spindle that has changed color from excessive heat or shows dimensional wear should be measured and evaluated by a qualified technician. Do not install a new bearing onto a spindle with damaged seating surfaces without confirming that the replacement will meet the manufacturer’s dimensional requirements.
Examine the axle tube and beam for cracks, bends, dents, corrosion, damaged welds, and impact marks. Surface rust may be manageable after assessment, but deep pitting, section loss, or cracking can reduce structural capacity. Do not weld, straighten, drill, or heat an axle beam unless the axle manufacturer or an authorized engineering procedure specifically permits that repair.
Brake and structural defects can develop together with axle problems because excess heat, overload, and misalignment affect several components at once. A brake that drags can raise hub temperature and damage seals, bearings, tires, and spindle surfaces. Therefore, a wheel-end repair that does not include a brake and spindle inspection can leave the original failure mechanism unresolved.
Lubrication should follow the axle and hub manufacturer’s specified product, quantity, application point, and interval. Clean grease fittings before connection, inspect fittings for blockage, and apply lubricant until the approved indicator or service method confirms distribution. Do not assume that pumping more grease provides additional protection, because excessive pressure can damage seals or contaminate brake components.
For oil-lubricated hubs, inspect the level, color, odor, and visible particles. A milky appearance can indicate water contamination, while metallic particles may indicate bearing, race, or gear-related wear. Drain and refill according to the approved procedure, dispose of used lubricant under local environmental requirements, and record the lubricant grade and batch when the fleet requires component traceability.
Lubrication intervals should be shortened for trailers exposed to water crossings, coastal salt, winter de-icing chemicals, dust, heavy loads, or frequent low-speed maneuvering. Refrigerated fleets may also require additional checks because repeated temperature changes can affect seals, condensation, and lubricant condition. A calendar-only plan is less reliable than a schedule combining time, mileage, operating environment, and defect history.
| Inspection frequency | Main responsibility | Required checks | Escalation trigger |
|---|---|---|---|
| Every pre-trip | Driver | Tires, wheels, hubs, leaks, visible cracks, suspension position, brake hoses, abnormal noise | Any safety-critical defect or major symptom |
| Monthly or every 5,000–10,000 miles | Technician | Tire wear, hub temperature, fasteners, U-bolts, suspension, brake condition, leakage | Repeated wear, loose hardware, heat difference, or fluid loss |
| Quarterly or every 15,000–25,000 miles | Technician | Alignment screening, wheel-end play, lubrication points, brake adjustment, corrosion review | Alignment deviation, bearing play, damaged seals, structural corrosion |
| Every six months or 30,000–50,000 miles | Qualified wheel-end technician | Bearing and hub service, spindle inspection, seal replacement as required, torque verification | Pitting, heat damage, contamination, abnormal endplay |
| Annually or according to OEM mileage limit | Senior technician or authorized facility | Full axle, suspension, brake, alignment, load-capacity, and documentation review | Cracks, recurring failures, capacity concerns, unresolved defects |
The intervals in this table are planning ranges, not universal replacement rules. The actual schedule must follow the axle manufacturer’s service instructions, local inspection laws, trailer age, mileage, load profile, climate, and prior failure data. Fleets should use the shortest applicable interval when multiple risk factors are present.
A severe-duty trailer may need monthly technician checks and six-month wheel-end service even when annual mileage is moderate. Examples include dump trailers, heavy-haul units, trailers exposed to saltwater, trailers operating on unpaved roads, and refrigerated equipment with high utilization. A low-mileage trailer should not be exempt from time-based inspection because seals, corrosion protection, lubricant condition, and rubber components can deteriorate while stationary.
| Condition | Normal action | Reason for escalation |
|---|---|---|
| Surface contamination with no dimensional damage | Clean, inspect, protect, and document | Prevent corrosion from obscuring later defects |
| Damaged grease seal with sound bearing and spindle | Replace seal, inspect lubricant, confirm endplay | Prevent contamination and brake contamination |
| Bearing pitting, flaking, blue heat marks, or race damage | Replace bearing and race set | Surface fatigue can return after partial repair |
| Worn or scored spindle seat | Replace approved spindle or axle assembly | Bearing fit and load transfer may be unsafe |
| Minor fastener loosening with undamaged parts | Correct, torque, and monitor | Identify why loosening occurred |
| Cracked axle beam, spindle, spring seat, or hanger | Remove from service and obtain engineering disposition | Structural repair requires approved procedure |
| Bent axle with measurable alignment deviation | Replace or use an authorized remanufacturing process | Straightening without engineering control can alter strength |
| Repeated tire wear after alignment correction | Investigate frame, suspension, load, and axle geometry | Recurrence indicates an unresolved system problem |
| Heat-damaged hub, spindle, or brake assembly | Replace affected components after root-cause inspection | Heat may reduce material and bearing integrity |
The repair-versus-replacement decision should include direct parts cost, labor, downtime, recovery expense, tire loss, repeat-defect probability, and remaining trailer life. A low-cost repair that causes two additional road calls can exceed the cost of a complete axle or wheel-end replacement. Fleet managers should compare the expected total cost over the next service interval rather than selecting the lowest invoice value.
Replacement sourcing should include dimensional drawings, axle capacity, track width, spindle configuration, brake compatibility, suspension interface, material specification, inspection records, and delivery lead time. For supplier evaluation, Linfeng’s product range includes trailer axles and multiple mechanical suspension configurations, but the fleet should request the exact technical documentation for the intended trailer model. Quality compliance and delivery risk should be assessed before a component is approved for production use.
A trailer axle maintenance record should identify the trailer number, axle position, mileage, date, technician, inspection points, measurements, parts installed, torque values, lubricant type, defect classification, and return-to-service approval. Photos are useful for cracks, tire wear, corrosion, leaks, and damaged fasteners, especially when a trailer moves between terminals. Digital records should retain the original defect, corrective action, verification result, and next due date.
Fleet managers should monitor measurable axle-related KPIs rather than relying on general impressions. Useful indicators include:
Axle-related road calls per 100 trailers per month
Repeat defects within 30 or 90 days
Pre-trip inspection completion rate
Preventive-maintenance completion rate
Average days out of service per axle event
Tire cost per 10,000 miles by axle position
Percentage of wheel-end inspections completed on schedule
Repair-versus-replacement cost by trailer age
Number of defects found before dispatch
Percentage of suppliers meeting delivery and documentation requirements
A practical target is to maintain 95% or higher completion for scheduled preventive inspections, while separately tracking overdue work and safety-critical defects. The target should be adjusted to fleet size and operating model, but the calculation must remain consistent. For example, a fleet with 500 trailers and 10 monthly axle road calls has a different risk profile from a fleet with 50 trailers and two road calls, even though both report the same raw event count.
Economic analysis should compare preventive labor and parts against avoidable costs. The cost model can include one inspection hour, lubricant and seals, alignment service, tire replacement, roadside towing, substitute equipment, missed delivery penalties, and technician overtime. If a preventive program costs $120 per trailer per quarter and reduces two $1,500 roadside events per 100 trailers each quarter, the avoided event value is $3,000, before considering tire savings or customer-service effects.
The first best practice is to assign each inspection task to the person qualified to perform it. Drivers should identify visible and operational symptoms, technicians should perform measurements and wheel-end work, and senior technicians or approved facilities should evaluate structural cracks, bent axles, spindle damage, and recurring alignment failures. This separation reduces the risk of treating a safety-critical defect as a routine adjustment.
The second best practice is to combine utilization and risk factors in the schedule. Classify trailers by annual mileage, average payload, maximum payload, route surface, salt exposure, water exposure, climate, refrigeration duty, and road-call history. A high-use trailer with repeated tire wear should receive more frequent alignment and wheel-end checks than a low-mileage unit with stable inspection results.
The third best practice is to establish clear escalation rules. Any crack, severe wheel play, smoke, grinding, rapid tire pressure loss, hub overheating, brake contamination, or major alignment deviation should trigger removal from service until assessed. Temporary roadside measures should not be treated as completed repairs when the underlying cause remains unknown.
The fourth best practice is to connect parts purchasing with maintenance records. Track the failure mode, supplier batch, installed date, mileage at failure, and trailer application for each replacement axle or wheel-end component. This information helps distinguish installation errors, operating overload, design mismatch, corrosion, supplier variation, and normal wear.
A trailer axle maintenance guide for transport fleets should use a layered schedule: driver pre-trip checks, monthly or quarterly technician inspections, six-month or mileage-based wheel-end service, and an annual review covering axles, suspension, brakes, alignment, load capacity, corrosion, and documentation. The most important controls are consistent inspection order, safe lifting, correct lubrication, measured bearing and alignment checks, verified torque, and immediate escalation of cracks, overheating, severe leakage, wheel play, or structural deformation.
Previous: Flower Display Chiller Vs Open Display Cooler: Pros and Cons
Next: Best Practices for Storing and Maintaining Concrete Pump Pipes
Copyright:@2020-2021

Comments Please sign in or sign up to post.
0
0 of 500 characters used